For the Montane Lapland Arctic Ultra SOTO is one of our sponsors and their Stormbreaker is the stove we recommend. While I was trail scouting this February I had the chance to test it and I want to tell you about how that went and give you some general input when it comes to extreme winter adventures and stoves.
Know your equipment
Please note that the following information does not replace the need to carefully read the manual that comes with the SOTO Stormbreaker!
What is immediately notable with the SOTO Stormbreaker is a very high standard of quality. I do not consider myself an expert when it comes to mechanics but even to me it is obvious that SOTO did not compromise when it comes to the quality of components and how these are put together. I really like the flexible but robust fuel hose and the way it is connected and disconnected to the burner unit. I was able to handle everything with pretty thick gloves. I also like that there are small and easy to use covers for the hose and the pump valve when you disconnect the burner from the pump. That way no dirt gets into the wrong places.
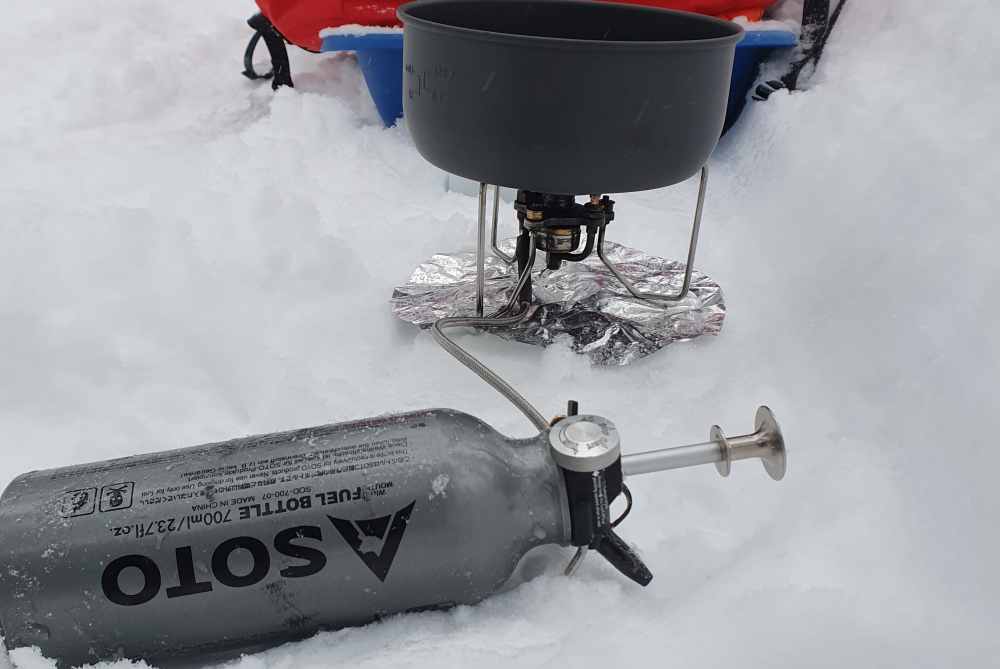
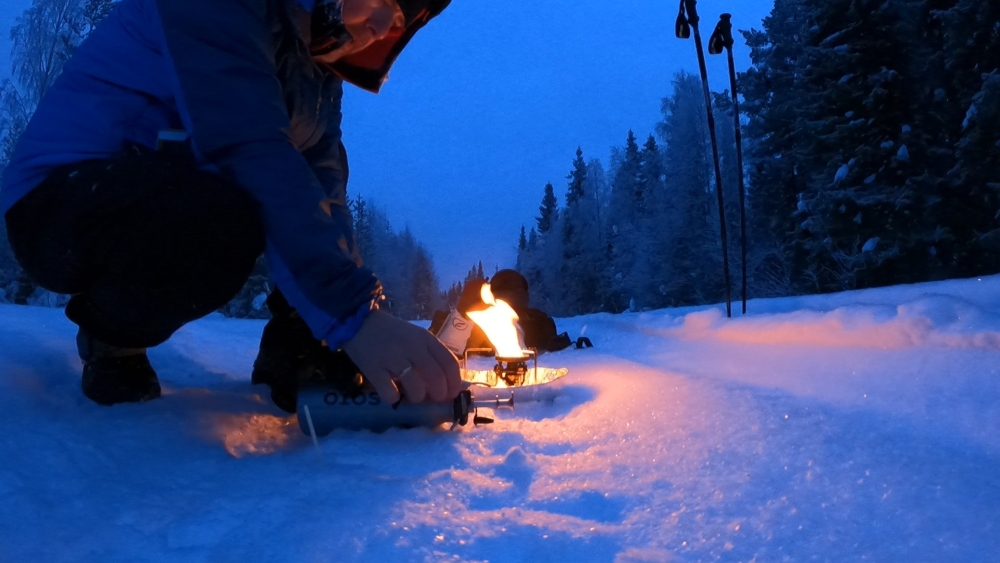
The SOTO Stormbreaker is very innovative. It has got several unique features. One of them is that there is a pin connected to the pump that shows you when you have the perfect pressure to start it. The way it is set up it requires a bit more pumping than in most other stoves but it’s great to have a visual confirmation that now the stove is ready to go. To start the Stormbreaker there is no need for regular pre-heating. You turn the dial on the pump to „Start“ and can then light it. It’s important to light it quickly because if you take too long there may be too much fuel on the burner and you get a large flame. The start mode is using quite a bit of the initial pressure and in cold temperatures you may need to pump again with the bottle horizontally on the ground (as seen in above image). When the flames are a consistent blue – which takes about 40 seconds – you just turn the dial to „Run“.
Once you are done boiling your water you continue by turning the dial to “Air” which will allow air to flow inside the hose while shutting off the fuel flow. Then you put the dial to “Stop” and push it down to secure it in place. In case you want to take the pump out of the bottle for refilling, you can use the “Air” position again to get rid of any excess pressure in the bottle.
I went through the entire process about three times. Then I felt comfortable with it. After that, everything had become routine and really easy. However, you need to give yourself that time. Try out your SOTO or whatever stove you use, several times. You can’t unpack it, read the instructions and immediately be an expert. Every product is slighly different. Ideally, you also get the chance to train in various conditions – it’s one thing to handle your stove when you are not tired and it’s rather warm. It’s very different when you are exhausted and caught in a snowstorm and/or extremely low temperatures. Handle your stove with different types of gloves – the thicker, the better. Train different methods of lighting it – matches, lighter and fire steel – to make sure you have alternatives when one of these fails.
The coldest it got during my tests was about – 28 degrees Celsius. I had also left the Stormbreaker outside an entire night in these temps and used it the morning after at around – 25. That is in the above video. I had no problems. If you watch carefully, you will see that I am making two mistakes: #1 my burner is not really level (see also “Setting up your stove” below) and I am spilling water when I am filling my thermos. This was just a test and no big issue. However, if you are out there and it’s very cold, both can get you in trouble. Very often the screw tops on a thermos can freeze tight if there is water on it. Not to mention that you can get wet gloves. If you are careful you can easily avoid both.
In general, just because you have not had any problems so far, does not mean it will always stay that way. That’s why, before you go on a race or expedition, set apart some time to carefully read the part of the manual that deals with repairs. When you are out there and something is not working, you will want to know what it could be and if/how you can fix it. Maintenance is super important, too. You can get many years out of your stove if you take good care of it.
Using the SOTO Stormbreaker with a gas canister
The SOTO Stormbreaker is equipped with a generator that allows the use of both LP gas and white gasoline. You do not need to change any parts in the burner when you switch over to a gas canister. I did try a regular type gas canister (i.e. no winter gas) and was surprised that I was I able to get it to work at very cold temperatures. However, it is not efficient when extremely cold and also not recommended by SOTO. The nice part about it is that you could make use of this type of fuel if you happen to do your expedition in fairly warm winter weather.
Setting up your stove
The aluminum stove base that comes with the SOTO Stormbreaker is small but does the job. If the snow was deep I just compacted it with my feet and then the base worked. Spend the extra few seconds to make sure your stove is in a level and secure position. Once the stove is running and the snow is melting in your pot you would hate to start all over again because your set-up was not stable and you spilled everything. Also, you may burn yourself trying to correct it in a hurry.
There is no windscreen with the SOTO Stormbreaker. So, you either need to pick a spot with no wind or create wind protection with some of your gear. It’s not like a bit of wind makes the flames go out but having no wind when you handle your stove makes it more efficient and more pleasant.
Melting snow
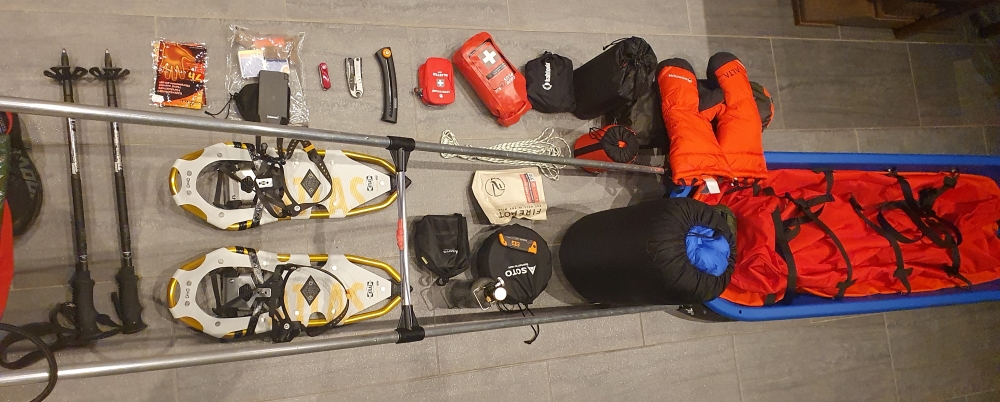
In a winter race or expedition you will most likely use your stove to melt snow or boil water that you already have or get from a creek, river or lake. Since the latter are likely frozen or unsafe to venture out on, you will normally melt snow. Melting snow is time consuming business but if you go 12 or more hours a day you do need a lot of water and food. If you start to delay water and food intake because you can’t be bothered to melt snow again, your energy levels will drop and you risk frostbite and hypothermia. Therefore, make sure you have enough thermoses with you. In the MLAU 3 litres are mandatory. Think about when and how much you want to drink and eat. Figure out how much of this you can cover from your thermoses and how much you will need to melt snow.
Let me tell you a story … from my test hike that I did in Sweden. When I was out on my second day I had planned to reach Jockfall at around 8 PM – after 12 hours of hiking. Fresh snow slowed me down and at about 7 PM it was obvious I would not make it. Still I thought I will just keep on going and I won’t bother having a break. BIG mistake! My energy levels dropped right down. From about 4.5 km/hour I went to 3.5 km/hour and slower. I kept on going until I really felt uncomfortable. Sure enough, after a meal and some hot tea, things looked different again. I have not done the math on it but I probably would have arrived up to 1 hour earlier had I eaten at the right time. I am sure many of you will go through similar situations in your expeditions and races. Stick to your plan for breaks, eat and drink when your body tells you to. Don’t postpone a stop just because you think you will soon get to your current destination anyway.
Use the right fuel
This is so obvious! However, I still got it wrong. Instead of simply buying gasoline at the gas station in Överkalix I asked if they had something in bottles that serves as fuel for my stove. The answer was “yes” and I then bought a product that looked like the type of stove fuel I would buy in the Yukon. Just that it was not! When I tried to fire up my Stormbreaker for the first time it did not want to work. It took me a while to figure out that it must be the fuel. Luckily that was just in a training situation. Had I already been out there, my only other option would have been to build a wood fire.
Wood fires
Talking about wood fires … It is of course very romantic to be in a beautiful wilderness setting and actually use a wood fire for cooking or snow melting. In a race you will likely not do it because it’s time consuming. Just beware that if your timing would allow you to build a wood fire anyway, it’s not that easy. There obviously are large areas with forests in Sweden but it is not necessarily allowed to use the wood you see in front of you. That is why all locals take firewood with them if they plan on building a wood fire. Another obstacle for wood fires is the snow. You can’t build one on the trail and off the trail the snow can be very deep. Any open fire will quickly burn down through the snow. So, it’s better not to include wood fires into your plans when it comes to preparing meals and hot drinks.
SOTO Navigator Pot Set
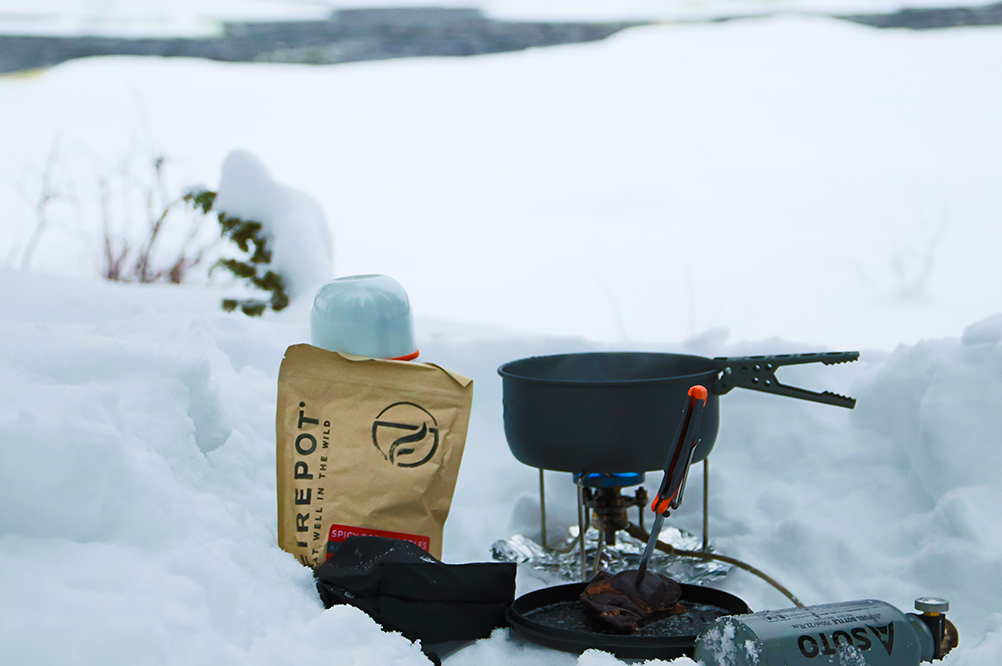
An important part of your solution for melting snow and preparing meals is the pot you use. For my test I used the SOTO Navigator Pot Set and I loved it! The 1,800 ml pot is great for melting snow and the 1,300 ml pot is perfect for preparing expedition meals. I used the Firepot Expedition meals that come with compostable Eco Packaging. This means the meals need to be prepared in a pot. The great thing about the 1,300 ml SOTO pot is that it comes with a separate insulation. That way you can take the pot off the stove, put it into the insulation and your meal will still be hot when it is ready to be eaten. I must say I also prefer to eat a meal out of a pot rather than a bag – it’s less messy …
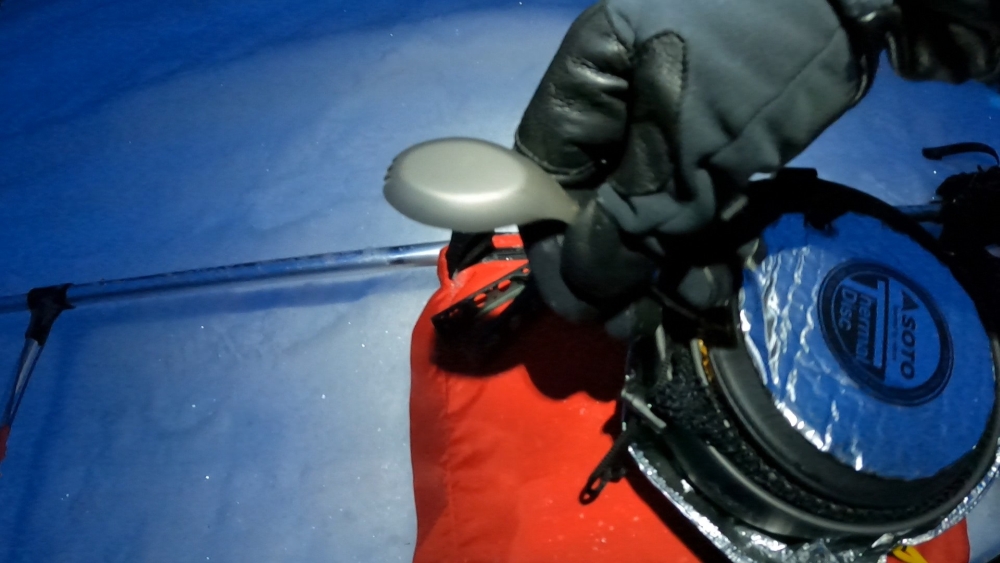
Last but not least, I liked the lids and the pot grip. The lids were great for scooping snow and of course a lid on a pot speeds up your snow melting/water boiling. The pot grip is vital when handling the pots.
Summary
To sum it up, I really enjoyed using my SOTO Stormbreaker and I am glad we have such a great partner for Montane Lapland Arctic Ultra!